Tire Guide — Motorcycle Tire Center, Orange CA
When to Replace
Your Motorcycle Tires.
The Complete Guide.
Tread depth is only half the story. Most motorcycle tires that fail prematurely had plenty of tread left — but the rubber had aged past its safe service life. Here's everything you need to know to make the right call.
Most riders know to replace a tire when the tread wears down. What far fewer riders know is that rubber degrades from the inside out regardless of how much tread remains. A five-year-old tire with 50% tread left can be significantly more dangerous than a two-year-old tire that's nearly worn out — because the compounds that give the tire its grip, flex, and structural integrity have been breaking down the whole time, whether the bike was ridden or not.
This guide covers the full picture: tread depth, how to find and read the date of manufacture stamped on every tire, what age-related degradation actually looks like and why it's dangerous, and what we recommend at MTC after years of pulling tires off bikes and seeing exactly what happens to rubber over time.
Section 1
Tread Depth — The Baseline
Tread depth is the measurement most riders know, and it's a legitimate starting point. The channels in your tire tread do real work — they evacuate water from the contact patch, allowing the rubber to maintain grip on wet pavement. As those channels wear shallow, wet weather performance drops off sharply. On a dry road the effect is less dramatic, but tread wear also indicates the tire casing itself is approaching the end of its useful thickness.
The legal minimum in California is 1/32" (0.8mm) of tread depth. That's the floor, not the recommendation. We suggest replacing well before you reach legal minimum — at around 2/32" on sport and performance tires, and 3/32" on touring and cruiser tires where stability and load-bearing matter more.
Full tread life remaining. Good wet and dry performance. Continue riding, inspect regularly for age and damage.
Wet weather performance is noticeably reduced. Start planning your replacement — don't wait until you hit the limit.
Below safe operating threshold. Replace immediately — do not ride in wet conditions on tires at this depth.
How to Check Tread Depth Without a Gauge
The easiest method is the tread wear indicators built into every modern motorcycle tire. Look for small raised bars running across the bottom of the main tread grooves — when the tread surface is flush with those bars, you're at the minimum. Most riders can't feel this from the saddle, so make a habit of crouching down and looking at the contact patch directly.
A tread depth gauge costs about $5 at any auto parts store and gives you exact measurements. Worth having in your toolkit. For a quick field check without any tools: a US quarter inserted into the tread groove — if you can see the top of Washington's head, you're at approximately 4/32" and should start planning your replacement.
Rear tires wear significantly faster than fronts on most motorcycles — especially on sport bikes where rear tire wear can be 3–4x the rate of the front. It's common to replace the rear twice before the front needs changing. Check both independently and don't assume they're in similar condition.
Section 2
Decoding the DOT Date Code on Your Tire
Every motorcycle tire sold in the United States has a DOT (Department of Transportation) compliance code molded into the sidewall. This code contains the tire's date of manufacture — and knowing how to read it is one of the most useful things any rider can know.
The full DOT code looks something like DOT U2LL LMLR 2318 and runs along the inner edge of the tire sidewall, sometimes partially hidden near the rim. The part you need is always the last four digits.
Week 23 of 2018 — manufactured in June 2018. If it's 2026, this tire is 8 years old. Replace immediately regardless of tread.
Week 01 of 2024 — manufactured in early January 2024. About 2 years old. Good service life remaining if compound is supple.
Week 48 of 2021 — manufactured in late November 2021. Approaching 5 years. Inspect compound carefully. Plan replacement soon.
Week 35 of 2019 — manufactured in late August 2019. Over 6 years old. Replace now regardless of tread depth or appearance.
The full 4-digit date code is molded on the outer sidewall of the tire — the side facing away from the bike. On some tires, especially when mounted close to the swingarm, you may need to look carefully. Get a flashlight and crouch down. The code is always present — it's a legal requirement.
A tire can sit in a warehouse or on a dealer's shelf for years before you buy it. A brand-new-in-box tire with a date code showing it was manufactured 3 years ago has already used 3 years of its service life before you put it on your bike. Always check the date code when buying tires, especially from discount retailers or online sellers. We don't sell old stock at MTC — but not every shop is as careful about rotation.
Section 3
Why Age Matters More Than Tread
This is the part most riders don't know — and it's the most important section in this guide.
Rubber is not inert. From the moment a tire is manufactured, the polymer chains that make up the compound begin to degrade. Heat, UV exposure, ozone in the air, and the mechanical stress of riding all accelerate this process — but it happens even when the bike sits untouched in a garage. The plasticizers and oils that keep rubber supple and grippy slowly migrate out of the compound over time. What's left behind becomes stiffer, more brittle, and less capable of conforming to road surfaces and generating traction.
The dangerous part is that this degradation isn't always visible. A tire can look perfectly fine on the outside while the internal structure has been compromised. The casing cords that hold the tire together under load can be weakened well before any cracking or discoloration appears on the surface. A tire failure at highway speed — a blowout or sudden loss of grip — can be catastrophic, and age-related failures don't announce themselves in advance.
What Actually Happens to Rubber Over Time
Hardening of the compound. Fresh motorcycle tire rubber has a specific durometer — hardness rating — that's been engineered to balance grip, longevity, and heat cycling. As the tire ages and plasticizers evaporate, the compound gets harder. Harder rubber has less contact patch compliance, reduced grip in cold conditions, and longer warm-up times.
Micro-cracking in the casing. Heat cycling — the repeated expansion and contraction as the tire heats up and cools down during riding — creates microscopic cracks in the rubber compounds between the casing cords. These cracks are invisible without magnification but they compromise the structural integrity of the casing over time.
Belt separation risk. On radial tires, the steel or Kevlar belts that reinforce the tread area can begin to separate from the surrounding rubber as the adhesive compounds age and lose their bonding strength. Belt separation typically has no visible warning signs until a bubble or bulge appears — at which point the tire must be replaced immediately.
Compound is fresh and at peak performance. Full grip, optimal flexibility, best cold-weather performance. This is the sweet spot for tire performance. Ride confidently.
Still well within safe service life for most tires stored and used in normal conditions. Inspect compound flexibility — it should still feel supple, not stiff or waxy.
This is the range where MTC recommends careful assessment. Compound hardening may be noticeable. Tires exposed to heat, UV, or ozone should be considered for replacement.
At five years and beyond, replace the tire regardless of remaining tread depth, visual appearance, or mileage. The rubber compound has degraded beyond the point where it can reliably perform to spec.
Section 4
MTC's Replacement Recommendation
After years of mounting and dismounting tires — and seeing the full range of what rubber looks like at various ages and storage conditions — here is our honest guidance:
Replace motorcycle tires that are 3 or more years old from the date of manufacture, unless the bike has been stored in ideal conditions and the compound passes a hands-on inspection. If the tire is 5 years old or more, replace it regardless of condition. No exceptions.
The "3 years" threshold is our conservative recommendation for bikes that see real-world SoCal conditions — heat, UV, coastal humidity, variable storage. It's not that a 3-year-old tire is automatically unsafe, but it's the point at which compound degradation becomes meaningful enough that we wouldn't recommend pushing it without a careful assessment.
The Storage Exception — When Tires Can Last Longer
A tire that has lived its life in a climate-controlled garage, away from sunlight and ozone sources, away from heat extremes, properly mounted on a bike that was stored on a stand — this tire ages more slowly. The plasticizers don't evaporate as quickly.
How do you assess this? Use your hands. Grip the sidewall and flex it. Fresh rubber is supple and gives slightly. Aged rubber feels stiff, almost plastic-like. Run your thumb firmly across the tread surface — it should feel slightly tacky, not slick or waxy. Look closely at the sidewall grooves and tread edges with good lighting — micro-cracks appear as fine lines in the rubber that widen when you flex the tire. If you see cracking, the tire is done regardless of age or tread depth.
This is the scenario we see most often — a bike that was ridden occasionally for a few years, then sat untouched for a few more. The tires look fine. There's plenty of tread. The owner pulls it out for the first time in two years and the tires are 6 years old. This is a genuinely dangerous situation. Sitting does not preserve tires. The compound degrades whether the bike moves or not.
Section 5
Visual Inspection — What to Look For
Beyond tread depth and date code, there are specific visual and tactile signs that indicate a tire needs replacement regardless of age or mileage. Check for these every few months and before any extended ride.
Fine lines or cracks in the sidewall rubber, especially in the sidewall grooves or at the base of the tread. Flex the sidewall — if cracks open up or widen, the tire is done. This is ozone cracking and indicates the compound is dry and brittle. Do not ride on a cracked tire.
Any bulge or bubble in the sidewall or tread area indicates internal belt separation or casing failure. This tire is structurally compromised and can fail catastrophically without warning. Replace immediately — do not ride.
A flat spot on the contact patch from extended storage under the bike's weight. Causes vibration and handling instability. Mild flat spots can sometimes work out after a few miles of riding; severe flat spots won't. Inspect before riding a stored bike.
Uneven wear in a scalloped pattern around the circumference of the tire. Caused by worn suspension components — specifically shock absorbers that are no longer damping correctly. Address the suspension issue and replace the tire.
Heavy wear down the center of the rear tire with good tread remaining on the edges indicates a rider who primarily does straight-line highway riding. Monitor closely and replace when center tread approaches minimum.
A waxy sheen or grayish discoloration on the tread surface indicates the oils and plasticizers have migrated to the surface and partially evaporated. The underlying compound is dryer than it should be. Check the date code and compound flexibility carefully.
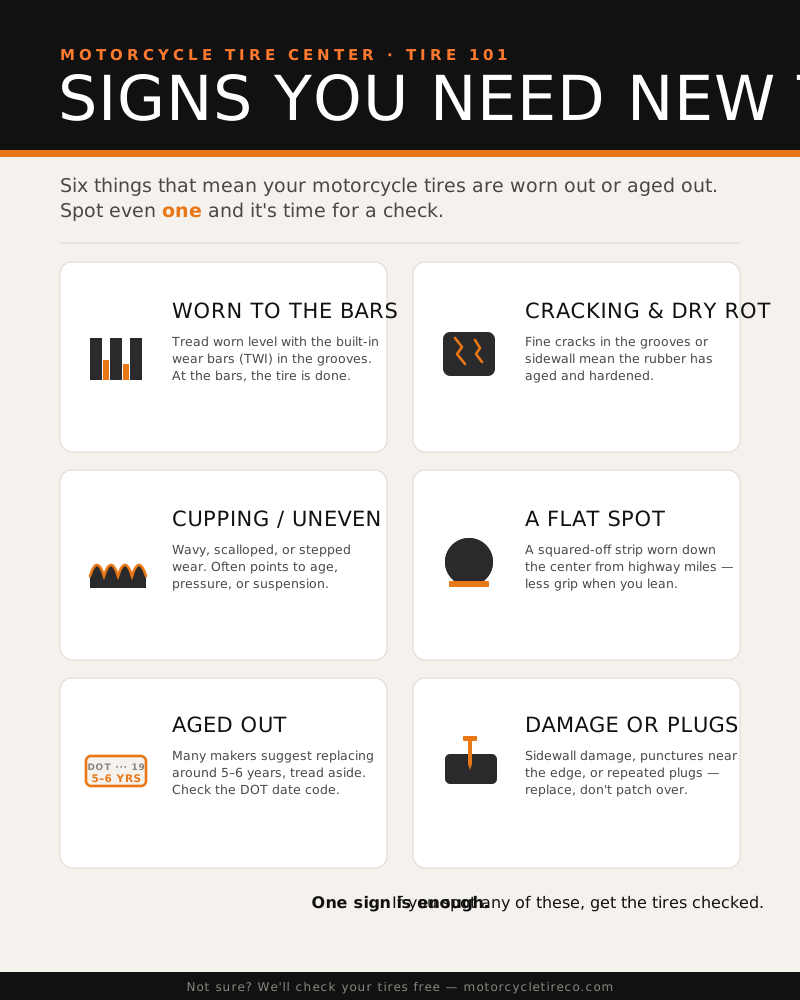
Punctures are case-by-case and must be seen in person. A puncture in the center tread lane may be repairable; one in the sidewall, at the edge, or anywhere outside the center lane is replacement only — it can't be safely repaired. A tire that's already been plugged gets a close inspection, not an automatic second repair. A qualifying tire repair is $99 — bring it by and we'll tell you honestly whether it's a fix or a replacement.
Section 6
How Storage Conditions Affect Tire Life
If you're storing a bike for any extended period — a few months or longer — how you store it has a direct impact on how much tire life remains when you pull it back out. The enemies of rubber are heat, UV light, ozone, and static deformation from the bike's weight.
- Store indoors in a climate-controlled space — consistent temperature and humidity slow compound degradation significantly
- Use a paddock stand or center stand to take the bike's weight off the tires — eliminates flat spotting from static load
- Inflate tires to recommended pressure before storage — do not over-inflate
- Cover the tires from direct light — UV degrades rubber even through a garage window
- Keep away from electric motors, battery chargers, and ozone-generating equipment — ozone attacks rubber aggressively
- Do not apply tire dressing or protectant to the tread area — silicone-based products reduce grip and can soften the compound unevenly
- Outside or open garage storage — UV, temperature swings, and ozone exposure dramatically shorten tire life
- Coastal environments — the combination of salt air and ozone from the ocean is particularly harsh on rubber compounds
- Southern California summer heat — tires stored in a hot garage during an OC summer age noticeably faster than tires kept at stable indoor temperatures
- Bike resting on tires under its own weight for months — creates flat spots and concentrates stress in one area of the casing
- Tire dressings on sidewalls — many contain petroleum distillates that swell and then shrink rubber, accelerating cracking
- Proximity to running engines or generators — combustion exhaust contains ozone that attacks rubber
If you're in Orange County or anywhere in Southern California, your tires are dealing with real environmental stress — high summer temperatures, significant UV exposure even in winter, and coastal ozone if you're anywhere near the beach. A 3-year-old tire that lived outside ages closer to a 4–5 year indoor tire. Factor this into your replacement timeline.
Section 7
Quick Reference
| Condition | Assessment | Action |
|---|---|---|
| Tread depth above 3/32" with no visible damage | Good | Continue riding. Check date code and inspect for age-related wear. |
| Tread depth 2–3/32" | Monitor | Plan replacement. Avoid wet riding. Check tread wear indicators weekly. |
| Tread depth below 2/32" | Replace Now | Below safe operating depth. Replace immediately. |
| Tire under 3 years old, good storage, supple compound | Good | Good service life remaining. Inspect regularly. |
| Tire 3–5 years old, indoor storage, no cracking | Inspect Carefully | Hands-on compound inspection. Plan replacement. Consider replacing proactively. |
| Tire 3+ years old, outdoor / SoCal storage | Replace | Environmental stress accelerates aging. Replace regardless of tread. |
| Tire 5+ years old regardless of conditions | Replace Now | Past safe service life. Replace immediately regardless of tread, appearance, or mileage. |
| Any visible sidewall cracking | Replace Now | Compound is brittle. Do not ride. |
| Any bulge or bubble anywhere on tire | Replace Now | Internal structural failure. Do not ride under any circumstances. |
| Flat spot from storage | Inspect | Ride carefully for a few miles. If vibration persists, replace. |
| Tire bought new but date code is 3+ years old | Assess | New-old-stock. Check compound flexibility. Consider requesting a freshly manufactured tire. |
| Bike sat unused for 2+ years | Inspect Thoroughly | Check date code, look for flat spots and cracking. Likely needs replacement especially if stored outdoors. |
Common Questions
Tire Replacement FAQ
Can I mix tire brands or replace just one tire?
My tires look fine and have plenty of tread. Do I really need to replace them based on age?
I just bought used tires that were stored properly. Are they safe?
How often should I check my tire pressure?
What's the difference between a bias-ply and radial tire, and does it affect replacement intervals?
Can I patch a motorcycle tire?
Keep reading
Related tire guides
Not Sure About Your Tires? Bring It In.
We check tires for free with any service visit — tread depth, date code, compound condition, and a visual inspection while the wheels are off. No obligation, no upsell. Just an honest assessment.